Blog
- Details
- Written by R. Elizondo
- Category: Basics of Software Development
PHP has an outstanding error and exception handling. Its correct implementation is key in modern high quality, fool-proof, fail-safe software applications. Either the System decides what to do in case of an exception, so to not stop execution of the process, or a message telling the Client what is happening is sent back.
Prerequisites:
- Fundamentals of PHP Programming - Part I
- Fundamentals of PHP Programming - Part II
- Basics of Object Oriented Programming in PHP - Part I
PHP Errors are not the same as Exceptions. Errors are reported by the PHP interpreter at execution time and are mostly caused by internal error conditions.
There are 2 directives in the php.ini file that are configured to either output or log them and to decide the level of error reporting. For more info on this go to php language errors
All internal PHP Functions are using error reporting and only the Object Oriented PHP Extensions are using Exceptions. Although there is a way to easily turn errors into exceptions with ErrorException its more common to just log PHP internal errors for taking care of them in other environment but in production. Also, a healthy PHP codebase shouldn't be reporting any errors in production.
Exceptions are objects that are handled by a try-catch model similar as many other modern object oriented programming languages and are very useful to get insight on the error code, the error message, the file and a trace from the start of the script to the line where the exception happened.
The most common way to implement an exception is like this:
        try {
            // some process here
            //...
        } catch (\Throwable $e) {
            throw new PreconditionFailedException($e->getMessage());
        }
Its important to notice that all Exceptions must implement Throwable Interface and you can create your own Exceptions extending other Exceptions or the Exception class itself:
class PreconditionFailedException extends HttpException
{
    public const MESSAGE_PREFIX = '';

    /**
     * @param $message
     */
    public function __construct($message)
    {
        parent::__construct(ErrorCodes::HTTP_412, self::MESSAGE_PREFIX . $message);
    }

    /**
     * @return mixed
     */
    public function getApiException()
    {
        return $this;
    }
}
In this case, this exception is sending back a message to the client and an HTTP Status 412 telling the Client that a Response cannot be produced due to a bad Request.
There are a few Exceptions already available in PHP that are extending the basic Exception class. You can use them directly, or create a new Exception Class extending any of these.
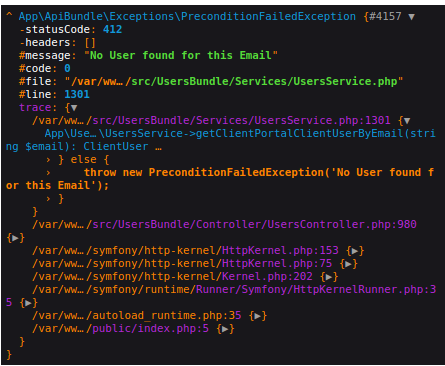
The following image shows a dump of the full exception object content produced when no User found for the email provided:

Exceptions are very powerful tool for Developers. You can use them for both, sending back to the Client a short useful message and a HTTP Status code (In the case of working in REST), and at Development time, to easily locate the file and the line that is causing the exception to happen.
A High Quality Software Application must return an Exception for each one of all possible failed use cases, because all clients are either expecting a successful response with an HTTP status code of 200, or an Exception message and the HTTP Status code.
For more on this refer to PHP Exceptions.
- Details
- Written by R. Elizondo
- Category: Cloud Virtualization
If you are planning to start a Web Site or need a Compute Instance (Virtual Private Server - VPS) for your project, there is a way to start for free, just follow these simple steps to get up and running a very powerful cloud server capable of running a High Performance Application including lot of space for the Database and asset storage.

At the moment of this writing Oracle Cloud is in my opinion the best option.
Oracle is an old Company and is practically the father of Databases.
Recently, they decided to be part of a multi billion Cloud Service Provider Industry dominated mostly for 3 big players: Amazon, Microsoft and Google.
As part of their marketing strategy and to showcase their infrastructure, they are offering a very nice, plenty of resources pool of Always Free Products.
Here is the recipe to get you a very powerful server for running any kind of software applications:
Step 1. Visit Oracle Cloud and sign up for a new Account clicking on Start for free.

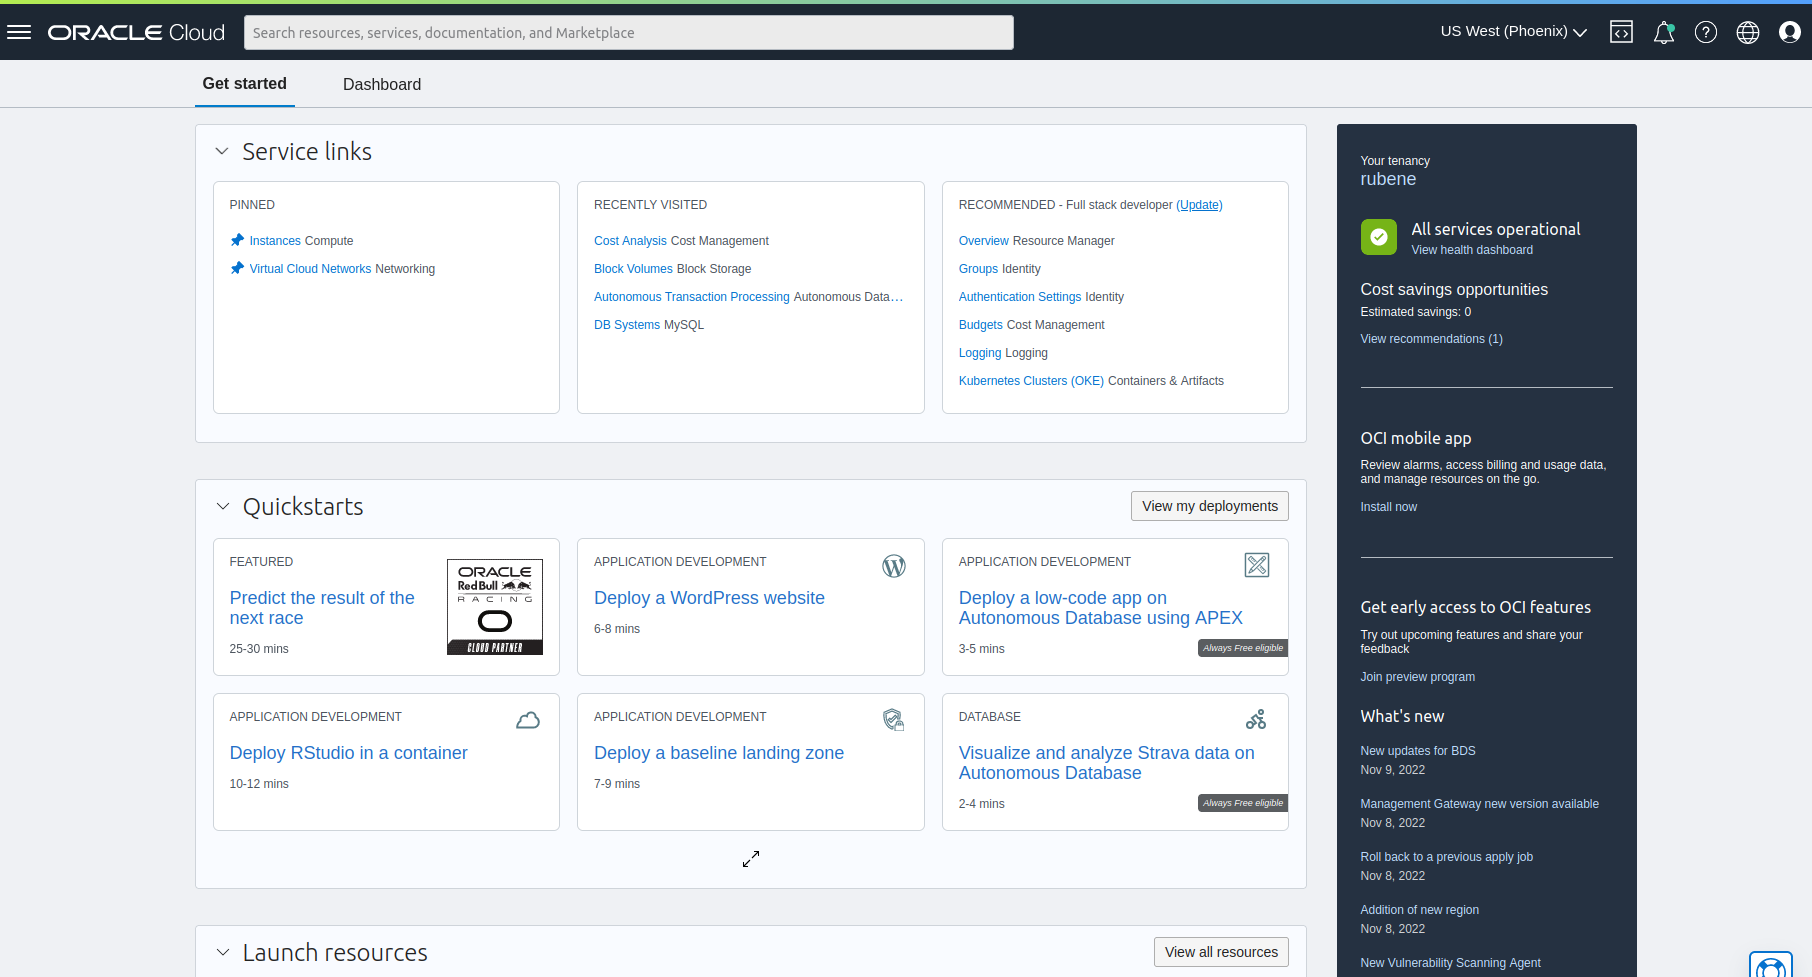
Step 2. Once you have you Account set up, sign in and you will see your dashboard.Click on Instances Compute. (If not available in Pinned select Compute->Instances from the top left menu).

Step 3. Click on the Create instance blue button.

Step 4. Click on the Create instance blue button.

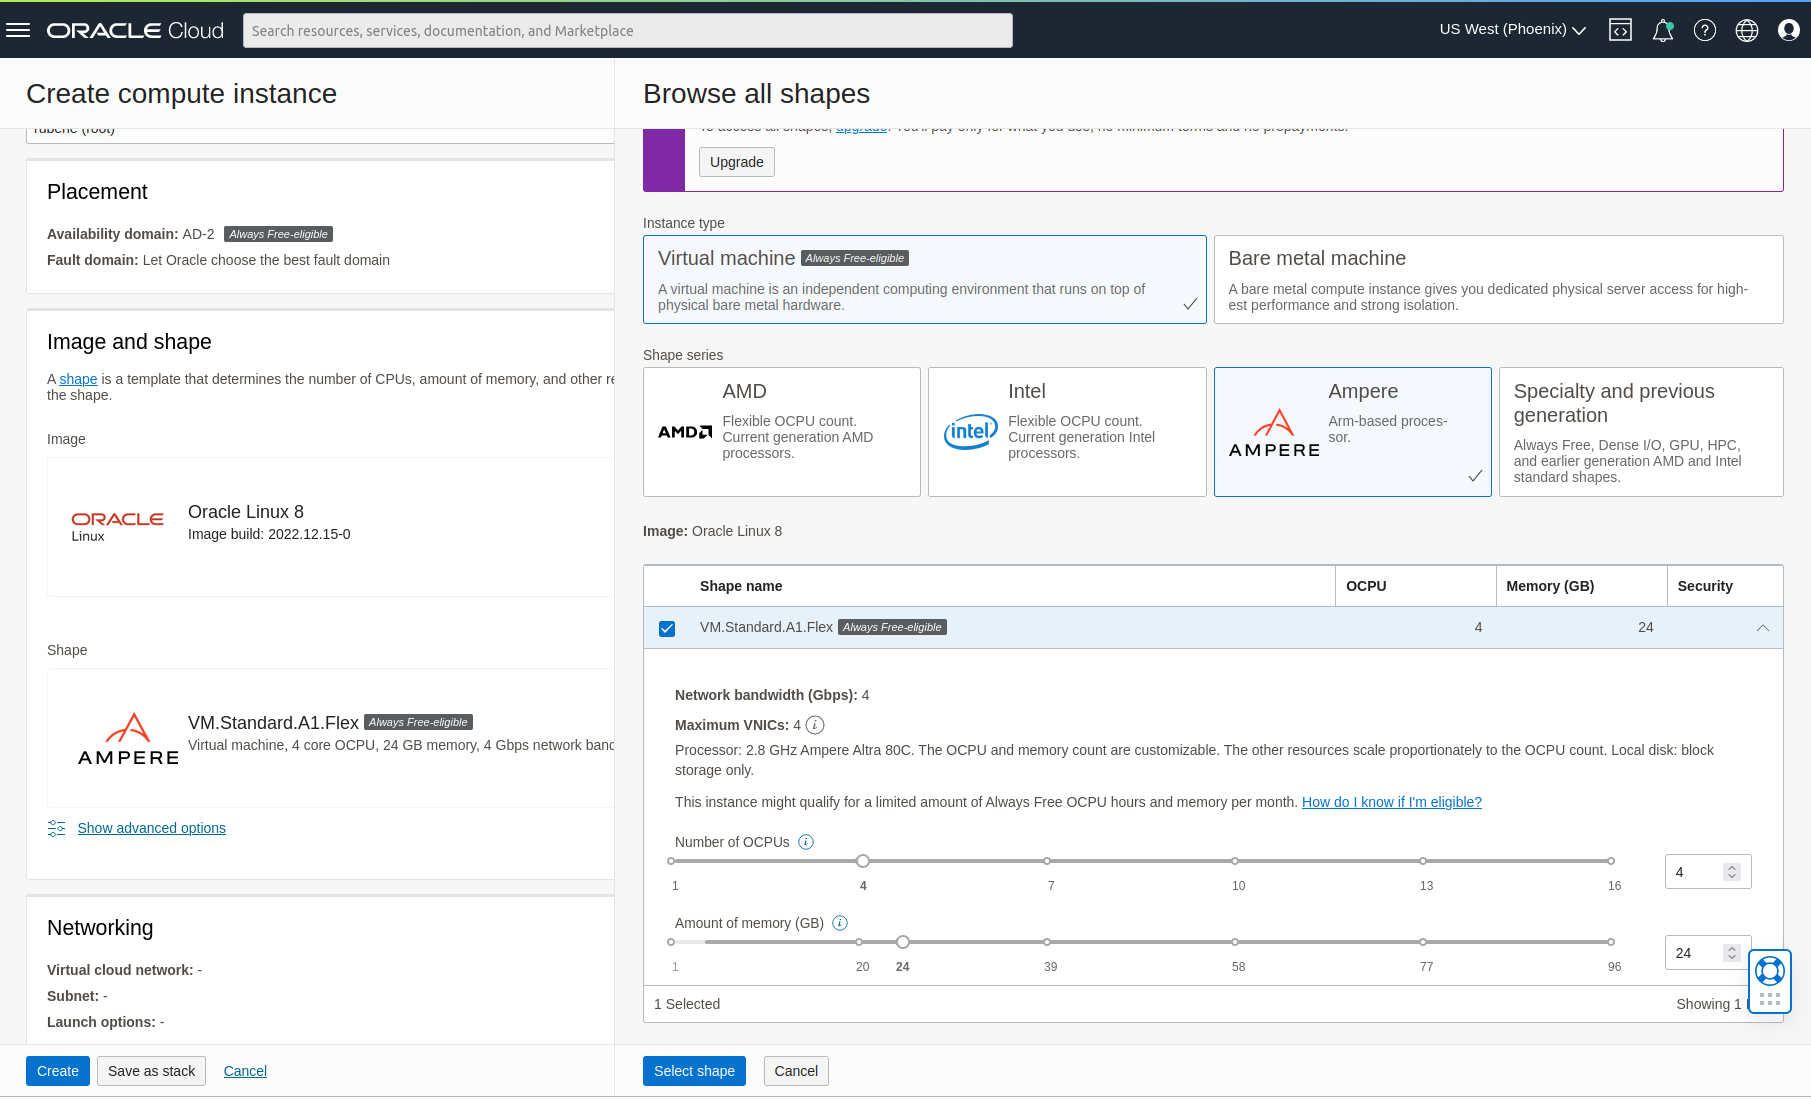
Step 5. You have the option to create up to 4 instances of this shape: VM.Standard.A1.Flex or 2 with double resources or 1 with up to 4 virtual cores and up to a massive amount of 24 GB RAM!

Notice that you need to select Oracle Linux and Ampere powered instances to be able to get this amount of resources for free.
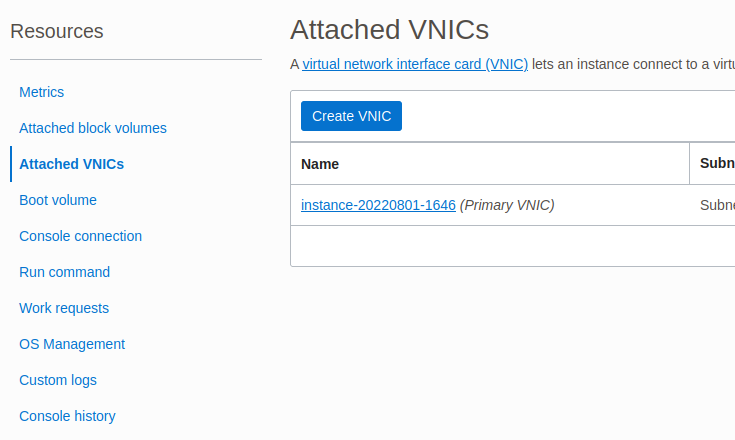
Step 6. Now that the instance is created, you need to attach it to a VNIC (Virtual Network interface).

Step 7. If you created only one instance with 50GB of boot volume, then you have available up to 150GB of block volume storage that you may want to create, attach and mount as a directory in your instance.

Now you have a fully functional COMPLETELY FREE Super Powerful Linux Server to install and run anything you want.
Further reading:
Oracle tutorial on launching a Linux Instance.
- Details
- Written by R. Elizondo
- Category: Virtualization
Once you have installed and configured your Vagrant Virtual Machine with Linux Centos 7 follow these simple steps to get up and running PHP7-FPM (Fast Page Manager):
Step 1. Once you vagrant up the VM, vagrant ssh to open a ssh console:
$ vagrant up
$ vagrant ssh
[vagrant@localhost ~]$
Step 2. Make sure you have epel repository available
[vagrant@localhost ~]$ sudo yum -y update
[vagrant@localhost ~]$ sudo yum -y install epel-release
Step 3. Get Remi Repository:
[vagrant@localhost ~]$ wget http://rpms.remirepo.net/enterprise/remi-release-7.rpm
[vagrant@localhost ~]$ sudo rpm -Uvh remi-release-7.rpm
Step 4. Install PHP-FPM
[vagrant@localhost ~]$ sudo yum install yum-utils -y
[vagrant@localhost ~]$ sudo yum-config-manager --enable remi-php74
[vagrant@localhost ~]$ sudo yum -y --enablerepo=remi,remi-php74 install php-fpm php-common
[vagrant@localhost ~]$ sudo systemctl start php-fpm
[vagrant@localhost ~]$ sudo systemctl enable php-fpm
Next Up:
Nginx with PHP-FPM in Vagrant Centos 7 Virtual Machine
- Details
- Written by R. Elizondo
- Category: Virtualization
PHP Fast Page Manager allows to execute PHP Code very fast. The best way to have a high performance site is to pair it with Nginx Web Server.
Prerequisites:
Install PHP7 with FPM in a Vagrant Centos 7
Step 1. Tell PHP-FPM that you will be using Nginx as Web Server. open with a text editor this file:
[vagrant@localhost ~]$ sudo nano /etc/php-fpm.d/www.conflook for user and group and chage them from apache to nginx:
; Unix user/group of processes
; Note: The user is mandatory. If the group is not set, the default user's group
;	will be used.
; RPM: apache user chosen to provide access to the same directories as httpd
user = nginx
; RPM: Keep a group allowed to write in log dir.
group = nginx
save the file.
Step 2. Edit the Nginx virtual host conf file that will point to the php project:
[vagrant@localhost ~]$ sudo nano /etc/nginx/conf.d/php_code.confmake sure you have this:
    location ~ \.php$ {
        fastcgi_pass   127.0.0.1:9000;
        fastcgi_index  index.php;
        fastcgi_param  SCRIPT_FILENAME   $document_root$fastcgi_script_name;
        fastcgi_param PATH_INFO $fastcgi_path_info;
        include        fastcgi_params;
    }
Save the file.
This code snippet is telling Nginx that all files with php extension must be passed to the Fast Page Manager Server listening in port 9000.
Step 3. Check your nginx configuration is correct:
[vagrant@localhost ~]$ sudo nginx -t
nginx: the configuration file /etc/nginx/nginx.conf syntax is ok
nginx: configuration file /etc/nginx/nginx.conf test is successful
[vagrant@localhost ~]$
If you don't get this response, something is wrong in your Nginx config file and you wont be able to serve web pages.
Step 4. Restart services:
[vagrant@localhost ~]$ sudo systemctl restart php-fpm
[vagrant@localhost ~]$ sudo systemctl restart nginx
[vagrant@localhost ~]$
Page 8 of 42

