Blog
- Details
- Written by R. Elizondo
- Category: Symfony Framework

Composer is a PHP package manager with the purpose of handling all your project dependencies leveraging the great autoloading feature available in PHP.
Modern PHP Projects are developed following Object Oriented Programming Best Practices and one of this is to encapsulate the code into classes, having each class in its own file (...read more on this topics).
These files are organized in folders in such way that the Symfony project installed here looks like:
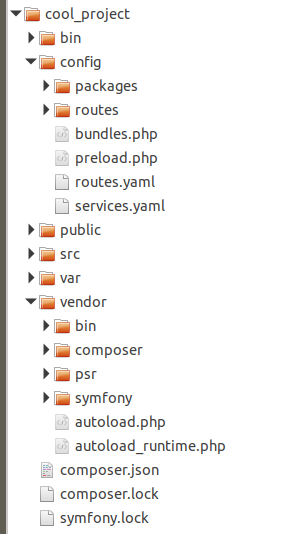
Install composer 2 in Linux / Unix / macOS machines.
Open a SSH console to the machine where you want composer to be installed.
You need to have PHP installed first.
If you want composer 2 to be available in project/directory/path
cd /project/directory/path

php -r "copy('https://getcomposer.org/installer', 'composer-setup.php');"
php -r "if (hash_file('sha384', 'composer-setup.php') === '55ce33d7678c5a611085589f1f3ddf8b3c52d662cd01d4ba75c0ee0459970c2200a51f492d557530c71c15d8dba01eae') { echo 'Installer verified'; } else { echo 'Installer corrupt'; unlink('composer-setup.php'); } echo PHP_EOL;"
php composer-setup.php
php -r "unlink('composer-setup.php');"
If you want composer 2 to be available in any directory in the machine:
sudo mv composer.phar /usr/local/bin/composerThis way you may call composer from everywhere but using sudo. If You don't want to use sudo, you may want to install composer 2 only for your user:
mv composer.phar ~/.local/bin/composer
Install composer 2 in Microsoft's Windows machines.
Just download the executable from here
Then run the .exe file. This .exe file will set the PATH for you so you can call composer 2 from everywhere in this machine.
- Details
- Written by R. Elizondo
- Category: Virtualization

Vagrant is a great and popular tool for building virtual machines in any computer.
It is widely used for building a virtual machine for development purposes with the exact same environment as in the production server.
This virtual machine can be replicated to as many other computers as you want, ensuring all developers will be working in the same environment, providing great consistency to the project.
Prerequisites: Have installed Oracle VirtualBox.
You need to choose based on the OS of the host computer. Most popular installations are:
macOS
brew install vagrantMS Windows x64
https://releases.hashicorp.com/vagrant/2.3.4/vagrant_2.3.4_windows_amd64.msiUbuntu / Debian
wget -O- https://apt.releases.hashicorp.com/gpg | gpg --dearmor | sudo tee /usr/share/keyrings/hashicorp-archive-keyring.gpg
echo "deb [signed-by=/usr/share/keyrings/hashicorp-archive-keyring.gpg] https://apt.releases.hashicorp.com $(lsb_release -cs) main" | sudo tee /etc/apt/sources.list.d/hashicorp.list
sudo apt update && sudo apt install vagrant
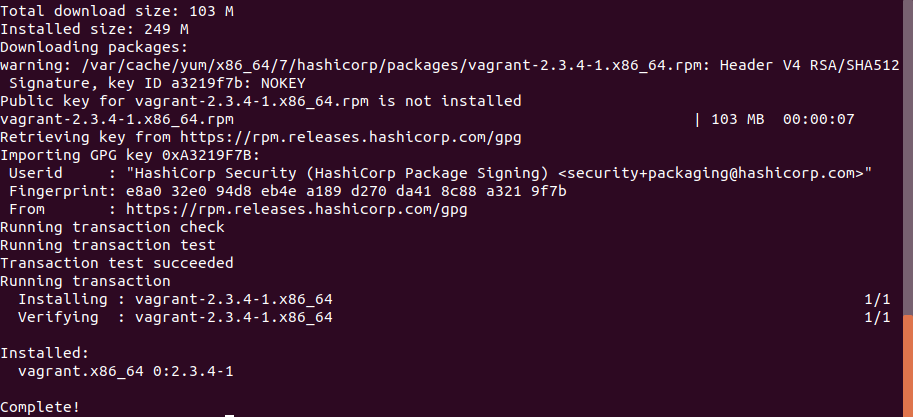
Once installed, open and ssh console (power shell in Windows and verify the installation):
$ vagrant
Usage: vagrant [options] <command> [<args>]

    -v, --version                    Print the version and exit.
    -h, --help                       Print this help.

 ...
If you get and error, try log out and login you user.
Once done you are ready to install a Virtual Machine.
create a project directory:
mkdir cool_vagrant_projectcd into it, then execute:
vagrant initthis will place a Vagrantfile in this directory with basic conf for up and running your virtual machine

If you open with a text editor the Vagrantfile
you will see something like this:
# -*- mode: ruby -*-
# vi: set ft=ruby :

# All Vagrant configuration is done below. The "2" in Vagrant.configure
# configures the configuration version (we support older styles for
# backwards compatibility). Please don't change it unless you know what
# you're doing.
Vagrant.configure("2") do |config|
  # The most common configuration options are documented and commented below.
  # For a complete reference, please see the online documentation at
  # https://docs.vagrantup.com.

  # Every Vagrant development environment requires a box. You can search for
  # boxes at https://vagrantcloud.com/search.
  config.vm.box = "base"

  # Disable automatic box update checking. If you disable this, then
  # boxes will only be checked for updates when the user runs
  # `vagrant box outdated`. This is not recommended.
  # config.vm.box_check_update = false

  # Create a forwarded port mapping which allows access to a specific port
  # within the machine from a port on the host machine. In the example below,
  # accessing "localhost:8080" will access port 80 on the guest machine.
  # NOTE: This will enable public access to the opened port
  # config.vm.network "forwarded_port", guest: 80, host: 8080

  # Create a forwarded port mapping which allows access to a specific port
  # within the machine from a port on the host machine and only allow access
  # via 127.0.0.1 to disable public access
  # config.vm.network "forwarded_port", guest: 80, host: 8080, host_ip: "127.0.0.1"

  # Create a private network, which allows host-only access to the machine
  # using a specific IP.
  # config.vm.network "private_network", ip: "192.168.33.10"

  # Create a public network, which generally matched to bridged network.
  # Bridged networks make the machine appear as another physical device on
  # your network.
  # config.vm.network "public_network"

  # Share an additional folder to the guest VM. The first argument is
  # the path on the host to the actual folder. The second argument is
  # the path on the guest to mount the folder. And the optional third
  # argument is a set of non-required options.
  # config.vm.synced_folder "../data", "/vagrant_data"

  # Provider-specific configuration so you can fine-tune various
  # backing providers for Vagrant. These expose provider-specific options.
  # Example for VirtualBox:
  #
  # config.vm.provider "virtualbox" do |vb|
  #   # Display the VirtualBox GUI when booting the machine
  #   vb.gui = true
  #
  #   # Customize the amount of memory on the VM:
  #   vb.memory = "1024"
  # end
  #
  # View the documentation for the provider you are using for more
  # information on available options.

  # Enable provisioning with a shell script. Additional provisioners such as
  # Ansible, Chef, Docker, Puppet and Salt are also available. Please see the
  # documentation for more information about their specific syntax and use.
  # config.vm.provision "shell", inline: <<-SHELL
  #   apt-get update
  #   apt-get install -y apache2
  # SHELL
end
To run a virtual machine you need to execute
vagrant upbut before doing this you need to change this config file a little bit so you can have the virtual machine provisioned, running in private network and sync'ing a project
You can find online many places where you can download a Vagrant file to get up and running your project in no time.
All of them install an Operating System in the virtual machine, most common are Ubuntu or CentOS and then provision it with all the dependencies required by an specific environment.
For the projects presented in this website you may want to check this post: Vagrant Virtual Machine with CentOS 7, Nginx, MariaDb, NodeJs and PHP 8
- Details
- Written by R. Elizondo
- Category: Virtualization
Before you can read and write data to the Database inside your virtual machine, you need to finish setting up MariaDB Server.
Prerequisites: Vagrant Virtual Machine with CentOS 7, Nginx, MariaDb, NodeJs and PHP 8
Step 1. After you init and provision your Vagrant Virtual machine, if the VM is suspended, just execute in the directory where the Vagranfile is:
$ vagrant upStep 2. execute
$ vagrant sshStep 3. Make sure MariaDb is up and running
$ sudo systemctl status mariadbStep 4. Execute
$ sudo mariadb-secure-installation
The server will ask you a few questions, you need to respond like this:
NOTE: RUNNING ALL PARTS OF THIS SCRIPT IS RECOMMENDED FOR ALL MariaDB
SERVERS IN PRODUCTION USE! PLEASE READ EACH STEP CAREFULLY!
In order to log into MariaDB to secure it, we'll need the current
password for the root user. If you've just installed MariaDB, and
haven't set the root password yet, you should just press enter here.
Enter current password for root (enter for none):
OK, successfully used password, moving on...
Setting the root password or using the unix_socket ensures that nobody
can log into the MariaDB root user without the proper authorisation.
You already have your root account protected, so you can safely answer 'n'.
Switch to unix_socket authentication [Y/n] n
... skipping.
You already have your root account protected, so you can safely answer 'n'.
Change the root password? [Y/n] Y
New password:
Re-enter new password:
Password updated successfully!
Reloading privilege tables..
... Success!
By default, a MariaDB installation has an anonymous user, allowing anyone
to log into MariaDB without having to have a user account created for
them. This is intended only for testing, and to make the installation
go a bit smoother. You should remove them before moving into a
production environment.
Remove anonymous users? [Y/n] Y
... Success!
Normally, root should only be allowed to connect from 'localhost'. This
ensures that someone cannot guess at the root password from the network.
Disallow root login remotely? [Y/n]
... Success!
By default, MariaDB comes with a database named 'test' that anyone can
access. This is also intended only for testing, and should be removed
before moving into a production environment.
Remove test database and access to it? [Y/n]
- Dropping test database...
... Success!
- Removing privileges on test database...
... Success!
Reloading the privilege tables will ensure that all changes made so far
will take effect immediately.
Reload privilege tables now? [Y/n]
... Success!
Cleaning up...
All done! If you've completed all of the above steps, your MariaDB
installation should now be secure.
Thanks for using MariaDB!
Step 5. Make sure you have access to the MariaDB
$ mysql -uroot -pEnter the password
you should see the MariaDB console

This means you are good to go.
type
MariaDB [(none)]> quit
- Details
- Written by R. Elizondo
- Category: Virtualization
Before you are able to run any PHP project in your Vagrant VM and display pages in a browser, you need to configure Nginx and set a Virtual Host.
The best way to configure it to to enable SSL and HTTP2, the same way as you should in your live Production Environment.
With SSL you will secure the data transferred to / from the Backend Server and with HTTP2 you will benefit of improved performance and high speed page loading.
Prerequisites:
- Vagrant Virtual Machine with CentOS 7, Nginx, MariaDb, NodeJs and PHP 8
- How to install Symfony Framework using composer in 2 easy steps
Step 1. Go to the directory where you have your VM and turn on your VM
$ cd ~/devzone/cool_vagrant_project
$ vagrant up
Step 2. Ssh into your VM and edit Nginx Web Server file
$ vagrant ssh
$ sudo nano /etc/nginx/nginx.conf
delete all lines in this file and replace them with:
user nginx;
    error_log  /var/log/nginx/error.log crit;
    pid        /var/run/nginx.pid;
    worker_processes  1;
    worker_rlimit_nofile 16384;
events {
    worker_connections  50000;
    multi_accept on;
    use epoll;
}
http {
    ssl_password_file /etc/nginx/certs/pass_file;
    default_type  application/octet-stream;
    include mime.types;
    access_log  off;
    keepalive_timeout 30;
    fastcgi_read_timeout 3600;
    proxy_read_timeout 3600;
    tcp_nodelay on;
    sendfile on;
    expires -1;
    server_tokens off;
    tcp_nopush on;
    types_hash_max_size 2048;
    fastcgi_cache_path /var/cache/nginx levels=1:2 keys_zone=microcache:100m max_size=500m inactive=60m;
    fastcgi_cache_key "$scheme$request_method$host$request_uri";
    gzip  on;
    gzip_disable "msie6";
    gzip_vary on;
    gzip_min_length 1100;
    gzip_buffers 16 8k;
    gzip_http_version 1.1;
    gzip_proxied any;
    gzip_types text/css text/x-component application/x-javascript application/javascript text/javascript text/x-js text/richtext image/svg+xml text/plain text/xsd text/xsl text/xml image/x-icon;
    include /etc/nginx/conf.d/*;
    open_file_cache          max=5000  inactive=20s;
    open_file_cache_valid    30s;
    open_file_cache_min_uses 2;
    open_file_cache_errors   on;
}
save the file.
Step 3. Create a Virtual Host file
$ sudo nano /etc/nginx/conf.d/cool_project.confand paste all this:
server {
    listen 80;
    server_name cool.project.vps;
    return 301 https://$server_name$request_uri;
}

server {
    client_max_body_size 20M;
    listen 443 ssl http2;
    server_name cool.project.vps;

    # SSL
    ssl_protocols TLSv1.2 TLSv1.3;
    ssl_prefer_server_ciphers on;
    ssl_ciphers ECDH+AESGCM:ECDH+AES256:ECDH+AES128:DH+3DES:!ADH:!AECDH:!MD5;
    ssl_certificate /etc/nginx/certs/nginx-cool-cert.pem;
    ssl_certificate_key /etc/nginx/certs/nginx-cool-key.pem;
    ssl_dhparam /etc/nginx/certs/dhparam.pem;
    ssl_session_cache shared:SSL:40m;
    ssl_session_timeout 4h;
    ssl_stapling on;
    ssl_stapling_verify on;
    ssl_trusted_certificate /etc/nginx/certs/lets-encrypt-r3-cross-signed.pem;
    resolver 8.8.8.8 8.8.4.4;
    add_header Strict-Transport-Security "max-age=31536000; includeSubDomains" always;
    ssl_session_tickets on;

    access_log /var/log/nginx/access.log;
    error_log /var/log/nginx/error.log;

    # Symfony public folder
    root   /var/www/cool_project/public;


    index index.html index.php;


    location / {
        # try to serve file directly, fallback to index.php
        try_files $uri /index.php$is_args$args;
   }

    # Symfony 5
    location ~ ^/(index|ocp)\.php(/|$) {
        fastcgi_pass   unix:/run/php-fpm/www.sock;###check conf in /etc/php-fpm.d/www.conf if set to use socket or IP -- 127.0.0.1:9000;
        fastcgi_index  index.php;
        fastcgi_param  SCRIPT_FILENAME   $document_root$fastcgi_script_name;
        fastcgi_param PATH_INFO $fastcgi_path_info;
        include        fastcgi_params;
        fastcgi_cache microcache;
        fastcgi_cache_valid  3s;
        add_header Cache-Control "no-cache, max-age=300, public";
        add_header X-Powered-By "Powered by Php 8+ / Nginx --- R. Elizondo";
    }

        # caching of files
    location ~ \.(xml)$ {
        add_header Cache-Control "no-cache, public";
        add_header X-Powered-By "Powered by Php 8+ / Nginx --- R. Elizondo";
    }

    location ~ \.(css|htc|js|js2|js3|js4)$ {
        add_header Cache-Control "cache, max-age=604800, public";
        add_header X-Powered-By "css/ js --- Powered by Php 8+ / Nginx --- R. Elizondo";
    }
    location ~ \.(html|htm|rtf|rtx|svg|svgz|txt|xsd|xsl)$ {
        add_header Cache-Control "cache, max-age=604800, public";
        add_header X-Powered-By "Powered by Php 8+ / Nginx --- R. Elizondo";
    }
    location ~ \.(asf|asx|wax|wmv|wmx|avi|bmp|class|divx|doc|docx|eot|exe|gif|gz|gzip|ico|jpg|jpeg|jpe|json|mdb|mid|midi|mov|qt|mp3|m4a|mp4|m4v|mpeg|mpg|mpe|mpp|otf|odb|odc|odf|odg|odp|ods|odt|ogg|pdf|png|pot|pps|ppt|pptx|ra|ram|svg|svgz|swf|tar|tif|tiff|ttf|ttc|wav|wma|wri|xla|xls|xlsx|xlt|xlw|zip)$ {
        add_header Cache-Control "cache, max-age=604800, public";
        add_header X-Powered-By "Powered by Php 8+ / Nginx --- R. Elizondo";
    }
}
Notice: This virtual host configuration is for working with How to install Symfony Framework using composer in 2 easy steps
There are other virtual host configurations available here.
Step 4. Generate SSL CA private key:
$ sudo mkdir /etc/nginx/certs
$ cd /etc/nginx/certs
$ sudo openssl req -x509 -newkey rsa:4096 -days 3650 -keyout ca-key.pem -out ca-cert.pem
When asked enter a password, then Country 2 letters Code, State, etc.
Its important that as Common Name you use the domain name of the website that will use the Certificate.
Enter a valid email and the last 2 leave them empty:
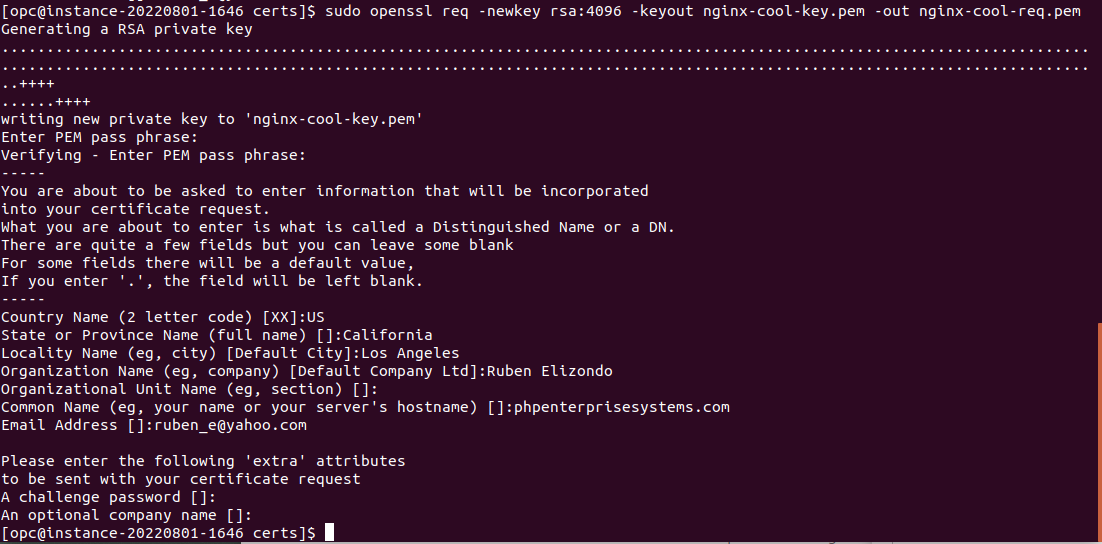
Step 5. Generate Web server's private key and CSR.
$ sudo openssl req -newkey rsa:4096 -keyout nginx-cool-key.pem -out nginx-cool-req.pemYou will be asked to provide the password you used to create ssl ca pem, then enter again Country 2 letter code and State, and optional email. All others you just hit enter.
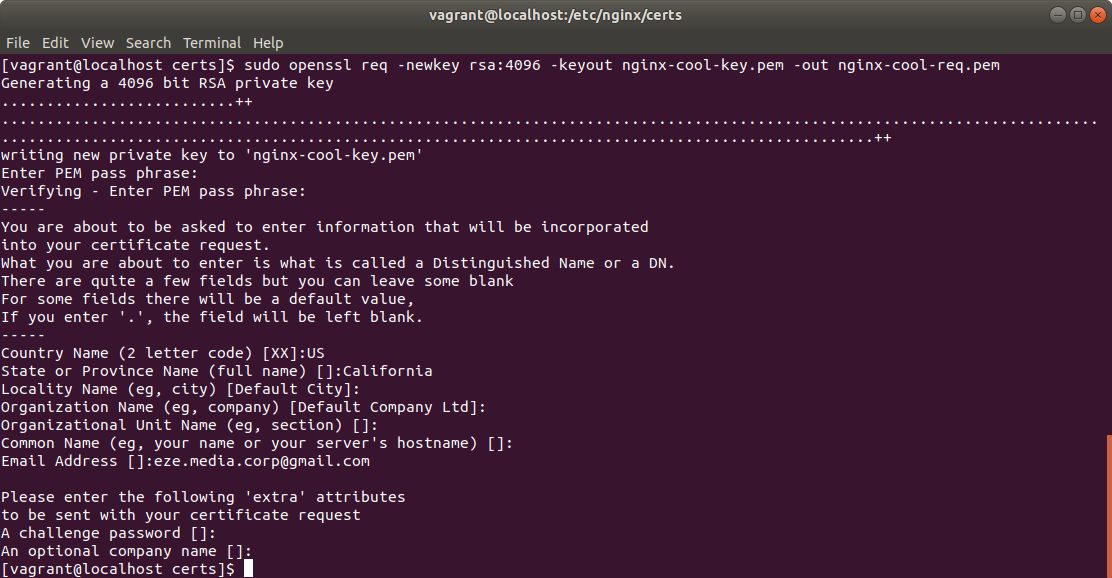
Step 6. Sign Nginx Certificate.
$ sudo openssl x509 -req -in nginx-cool-req.pem -days 3650 -CA ca-cert.pem -CAkey ca-key.pem -CAcreateserial -out nginx-cool-cert.pem
Step 7. Generate DH Params Cert.
$ sudo openssl dhparam -out /etc/nginx/certs/dhparam.pem 2048Step 8. Get lets-encrypt cert
$ sudo wget -O /etc/nginx/certs/lets-encrypt-r3-cross-signed.pem "https://letsencrypt.org/certs/lets-encrypt-r3-cross-signed.pem"
Step 9. Save password file so Nginx can read the key to validate the certificate and be able to serve TLS.
$ sudo nano /etc/nginx/certs/pass_file
# Write down the password you used  when creating the pem.
# Save the file.
Step 10. Make sure you did everything right.
$ sudo nginx -tyou will be asked for the pass you use for the ssl cert. then if everything went fine you will be seeing something like this:

Step 11. Reload Nginx configuration.
$ sudo systemctl restart nginx
Step 12. Set a virtual domain in your host machine adding the following entry to the hosts file:
92.168.56.10 cool.project.vps
IP is the one you set in the Vagrantfile as private network
In Linux / macOS machines:
$ # Exit from Virtual Machine ssh session
$ exit
$ # Edit host file
$ sudo nano /etc/hosts
Next Up:
Configure PHP in Virtual Machine to work as LEMP Server
Page 3 of 42

